
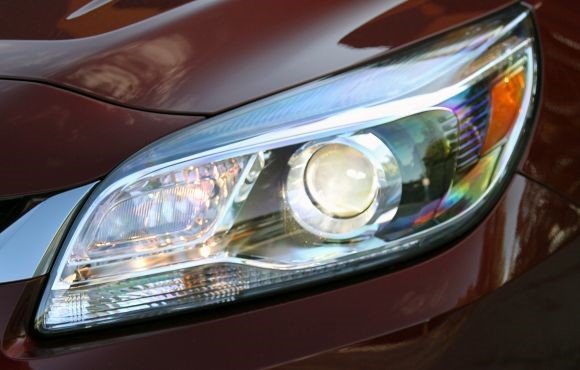
Should I Restore My Headlights
Debating on whether to replace or restore your headlights? Headlight restoration for your vehicle is a wise choice if you’re interested in saving some cash. If there is visible life still left in your stock car lights behind the cloudiness, restoring your headlights on your own is a cost-effective project that is capable of completion in just a few hours.
It can become a slippery slope when your headlights begin to fog or fade and overtime the diffusion of your headlights caused by prolonged exposure to UV rays, traffic exhaust, and sitting moisture can diminish your visibility when traveling at night. If you don’t wish to replace your headlights and you’re a self-doer who loves a good weekend project, follow the steps for headlight restoration below and learn how you can revitalize your headlights on your own.
Headlight Restoration Tools
- Orbital Sander
- Sanding discs
- Headlight Restoration Coating
- Polishing Compound
- Buffing or polishing discs
- Headlight Protective Coating
Steps to Restoring Headlights
Step One: Preparation
Thoroughly clean and scrub the surface of your headlights with soap or cleaning solution designed specifically for headlights. Prep the area around your headlights by taping a perimeter with painters tape so you do not scrape or scratch your vehicle’s paint during the sanding stage.
Step Two: Sanding Your Headlights
You will notice the oxidized blurriness across sections of your headlights or even atop the whole surface area and sanding is a sure way to reduce the foggy film. Using the recommended sandpaper from your headlight restoration kit, or a 400-500-grit sanding disc, gently press your automatic orbital sander tool across the surface. Be careful not to apply too much pressure, because cracking or breaking your headlights is a possibility.
Step Three: Wet Sanding The Headlights
Spend time during this step wiping the headlights with a wet rag and using a spray bottle to maintain a wet surface. Going back over heavier oxidized spots with a stronger sandpaper grit will get the remainder of the yellow or blurred portions and we suggest a heavier grit in the range of 1000-3000 grit sandpaper. This step requires some patience, but with the right circular sanding technique and coverage, you will prevail.
Step Four: Using a Foam Buffer and Polishing Compound on The Headlights
Using a foam pad or buffer works great when it comes to the polishing stage. Rubbing and polishing compound with refresh the appearance of your headlights, and after a few minutes of buffing, take a microfiber cloth to wipe off the excess solution. Repeat until you receive the clarity you desire in your headlights.
Revitalizing Old Car Headlights
There are a handful of headlight restoration kits available to drivers, and with the right tools, time, and ability, you can bring your headlights and night time clarity on the roads back to life with a visual appeal that you thought would never return. Keep in mind that some headlights may require more attention than others.
However, if time passes and you aren’t totally satisfied with the result your headlamps, view and compare replacement headlights for your specific model year. Ordering car headlights online is just as simple as the installation and you can gain the satisfaction of showing up in the work parking lot with that new car look and a broader sense of clarity.