

How to Inspect Your Oil Like A Pro
Most automotive experts would agree there are pros and cons to synthetic oil and conventional oil when you’re in need of an oil change. Although a number of factors come to mind, such as cost and vehicle type, it mainly comes down to driver preference. Speaking candidly, not all drivers know everything there is to know about motor oil, which is why many rely on their mechanics to get the job done. Should I upgrade to synthetic? Is conventional oil bad? What are the disadvantages of synthetic oil? These are the questions that often get asked by drivers who are unfamiliar with routine maintenance. The truth is, oil is one of the easiest wellness checks that every car owner should know how to do. And it doesn’t take much to know which oil is best for your vehicle. Why spend more money at the auto shop when you can do the job yourself? And, for half the price! Below we’ll break down how to inspect your oil in 9 easy steps with the hope that all drivers can make use of this DIY approach.

Steps to inspect your oil (in only a few minutes!)
Checking your car’s engine oil is not only quick but even the most novice car enthusiasts can do it. Even if you don’t feel up for the task of changing the oil yourself, it’s still helpful to know how to inspect your oil to ensure your car in working in good condition.
Follow these 9 steps to inspect your oil at home:
#1: Grab an old t-shirt or rag
You want to use a piece of material that is clean and lint-free to avoid any contamination or dirt build-up. Don’t use a cloth or towel that you’re afraid to get dirty. Motor oil can leave permanent stains!
#2: Peruse your owner’s manual
This tip is mainly for beginners, but it still remains important. Read your owner’s manual to find out the exact location of your dipstick and other important details concerning an oil check. Here you’ll find out what type of oil is best for your engine as well.
#3: Get the engine running
In order to get a good read on your oil condition, this step is crucial. Take your vehicle for a few spins around the block or just make sure the engine is running for a least 5 minutes. Warming up the vehicle will allow the oil to flow and become less viscous.
#4: Let the engine cool down before you inspect your oil
Next, turn your car off and let the engine cool down a bit. We recommend waiting at least 2-3 minutes, but it depends how long you’ve had your vehicle running for. Altogether, being cautious will help ensure you don’t burn yourself while working under the hood.
#5: Time to pop open the hood
Your owner’s manual will tell you explicitly how to open your hood, however, the lever is usually located somewhere near the driver side door. Every make and model has a different process for unlocking the hood so knowing this will make future oil checks a breeze. Once located, press the lever and the prop open the hood of your car.
#6: Find the dipstick
Typically, you’ll locate the dipstick on the left side of your vehicle’s engine. It will have a yellow or orange handle that is easy to detect as well. Take a minute to properly locate the dipstick and if you’re still unsure, revert back to your car’s manual for help.
#7: Remove the dipstick
Once you pinpoint the yellow or orange handle, proceed forward by pulling it out of the engine slowly. You’ll now see a thin piece of metal with oil on it.

#8: Clean the dipstick
Take the rag or old t-shirt from Step #1 and use it to wipe down the long metal piece. When this step is complete, you’ll want to insert the dipstick back into its tube.
#9: Remove the dipstick again and inspect your oil
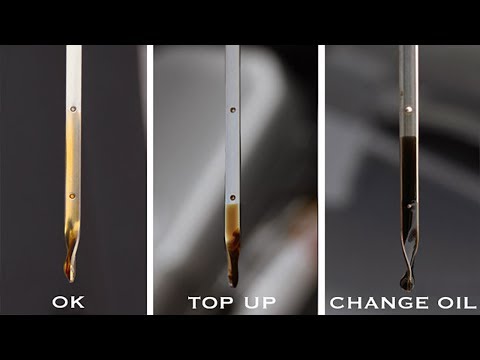
Take the dipstick out once more, but this time look at the end of the dipstick. Depending on the make and model of your vehicle, it will have marks and indications that show the accurate level of your motor oil. A line marked “full” or “max level” could be present, otherwise you’ll usually see a textured region that descends upward.
To get a visual of this process, watch the video below to differentiate a normal oil level from low or dirty oil.
And you’re ready to go
Checking your motor oil quality is really that easy! After the first or second time, you’ll have the process down pat. Although your vehicle may have tabs on your oil level, its always a good idea to check it yourself from time to time. Some automotive experts even suggest checking it once a month. Now that you know how to inspect your oil, we hope more drivers find the time to keep up with this important maintenance task. It’s fast, simple, and easy which means even the busiest of people can spare a few minutes to check in on their vehicle’s health.